Not before a long time ago, replacing any laptop’s hard drive literally meant packing up the system and shipping it back to its maker, or dropping it with a local repair shop. Either way, you’d have to live without your beloved computing companion for some time, and depending on who was doing the work, you’d likely pay plenty. Fortunately, most of today’s notebooks allow easy access to their hard drives and certain other components. Here’s all you need to know about how to change laptop hard drive and i am sure that it is going to help someone and you are gonna save some money too.
How to change laptop hard drive
There are couple of steps which you need to follow when you are changing the hard drive of your laptop. The best place to start when you want to upgrade or replace your hard drive is with the user’s guide for your laptop. If the disk-swapping procedure is simple, the guide will tell you how to do it. In that case, you won’t need any further help, though some of the tips offered here may make the operation easier and safer for you and the equipment. If you want to replace your drive, you need to know whether your laptop requires an older 44-pin ATA-style drive or a newer edge-connector SATA drive; the former are found only in older laptops. You can still find ATA drives?as well as some ATA SSDs?but you might be better off using a small SATA-to-ATA bridge adapter. if you’re reading this down the road, you may also encounter a small issue requiring a BIOS upgrade.
Step 1: Choose your drive well
The standard drives in modern laptops—excepting a few of the very slimmest ultraportables—conform to the 2.5-inch-wide hard drive form factor. Most laptop upgrade drives sold today are 2.5-inch and rotate at 4,200rpm, 5,400rpm, or 7,200rpm, offering capacities of 300GB or more. All else being equal, the faster the spin rate, the better the performance you should expect.
Drive prices vary depending on storage capacity, rotational speed, transfer rate, and the amount of buffer memory (cache). For example, a Seagate 200GB drive that spins at 7,200rpm and has a 3 gigabit (Gb) per second maximum transfer rate and 16MB of cache will cost around $150, whereas a slower (5,400rpm) 250GB drive with a 1.5Gb-per-second top transfer speed and an 8MB cache can be had for under $100. If sheer storage space is what you’re after, great deals abound on high-capacity drives that spin at 4,200rpm or 5,400rpm, whereas top-of-the-line, high-performance drives cost more and tend to offer extra features such as encryption and enhanced shock protection.
Ideally, your new hard drive will be faster and hold more data than its predecessor, but its most crucial parameter is whether it’s compatible with your laptop’s drive controller. Serial ATA (SATA) and Ultra ATA/IDE are the typical interfaces used in laptop systems. A typical ATA/IDE 2.5-inch laptop drive has a 44-pin edge connector and four jumper pins (resembling a desktop IDE drive), while SATA drives employ SATA-standard slot-style connectors. Some laptops employ a proprietary pin connector that connects the drive to the controller. Usually, this connector is mounted on the drive caddy (a carrier that inserts in the laptop’s hard drive bay) or attaches directly to the drive’s pins; either way, the connector must be detached from the old drive and connected to the new one.
A third possibility: Your old drive may employ a different type of connector—a ZIF connector—built into the drive itself. If yours does, make sure your new drive has the same type of connector. Another option is to purchase a converter that supports the interfaces on your drive and laptop, but your best bet is to match your new drive’s interface directly to the one used by your laptop, particularly if you’re dealing with tight spaces. The extra bulk or length added by a converter may prevent the drive from fitting properly.
Note that the overall thickness of your new hard drive may determine if it will fit into your system. You’ll almost certainly be replacing a 2.5-inch-wide drive with another 2.5-inch drive, but thicknesses can vary among these drives, so make sure you don’t purchase one that’s thicker than the original—it may not fit properly. If you’re unsure of your old drive’s measurements, check the specifications online, using the model number of the drive.
Most online sellers of laptop upgrade drives provide a drive-compatibility chart that lists nearly every popular laptop model out there and which drives will work with them, so be sure to do a little research before making your purchase.
Step 2: Back up your files
Well by the name you know what to do, you know that even if it is a million dollar laptop device that is not more important, what is important is your data that is in that hard drive of yours. so make sure that you are taking proper back up before you even proceed for this.
Depending on the data you have, to store and back up the data may be a time consuming process.
Another option: The $49 USB 2.0 Data Transfer Kit from CMS Products (www.cmsproducts.com) is a USB-based system comprising software and an empty external drive case. You install your upgrade drive into the case and duplicate the contents of your old drive straight to the new one. You then swap the drives; the new drive in your laptop now contains your complete OS, data, and apps, and, as a bonus, you can use the old drive in the enclosure as an external backup unit.
Step 3: Gather your tools
To replace your hard drive, you’ll need (at a minimum) a high-quality small-head Phillips screwdriver; you may also need hex-head Torx drivers and with recent Macs, a pentagonal driver. Ideally, you would use a good multitool with a comfortable grip and swappable flat, Phillips, and Torx tips of appropriate size for laptops, cell phones, and the like. Thin-handled jeweler’s screwdrivers are undesirable because they may not allow you to apply enough force. If you don’t have the right tools for the job, you can probably find them on Amazon and eBay, or at your local hardware store or Radio Shack.
For some laptops, you may also need a spudger?a plastic or metal tool that you can use to gently pry apart pressure-fit plastic parts. Older Mac laptops are infamous for requiring spudgers, but many other laptops also call for some gentle prying before they’ll grant access to their guts. If your spudging skills aren’t well developed, stick with plastic versions; they wear out more quickly, but they’re less likely to scratch metal surfaces or cause electrostatic damage. Spudgers are inexpensive, too, so you can grab an array of thicknesses and shapes at little cost.
Step 4: Know the risks
Hidden fasteners:
When you’re disassembling a laptop or other device, don’t try to force things apart. In all likelihood, if you have to exert more than modest force to remove or separate parts, a hidden screw or fastener is holding up progress. You may need to remove another part or turn the unit over to find what’s holding things together. Many laptop manufacturers hide important screws under rubber feet, labels, and panels for aesthetic reasons; but you can seriously damage your laptop by attempting to wrench it apart while some screws are still in place.
Some tiny connectors have latches that are difficult to spot. If a cable doesn’t coming out as easily as you think it should, take the time to look for a latch.
Keep an eye out for small cables and connectors when taking apart your laptop to replace your hard drive.
Cables:
Hidden cables are another common laptop hazard. All parts of a laptop other than shields and miscellaneous plastic are connected electrically, and if a socket isn’t handling the job, a cable is. Ribbon cables and wire cables run from the keyboard deck (the upper half housing the keyboard and touchpad, among other things) to the motherboard, from daughter boards to the motherboard, from the motherboard to the base, from the modem to the motherboard, and so on. Other cables connect the touchpad, the finger swiper, the status lights, the speakers and any other components embedded in the keyboard deck.
Removing ribbon cables generally entails flipping up a tab at the back of the slot where the cable terminates. Wire cable connectors usually terminate in pressure-fit connectors that must be pried out. Sometimes you may have to depress a small catch. A spudger handles this task very well.
When disassembling a laptop, it pays to be organized and to take notes. For example, when I need to perform a complex breakdown that I’ve never done before, I either video the disassembly procedure or take photos that show where the screws and parts belong at each major step. This approach may seem laborious, but it can be a tremendous help when you reassemble your laptop. That said, don’t go crazy: If all you have to worry about are four identical screws, don’t bother.
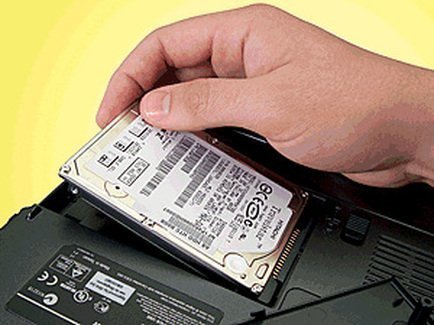
Step 4: Remove your old drive
Before doing anything else, unplug the laptop and remove the battery to avoid potential damage to the motherboard (and yourself). Turn the laptop upside down and look for a removable panel or a hard drive release mechanism. Laptop drives are usually accessible from the bottom or side of the chassis. Typically, you release the drive by flicking a lock/unlock button and/or removing a screw that holds the drive in place.
If you’re unsure how to physically remove the drive, refer to your user’s manual or visit the vendor’s Web site for detailed instructions. Also, check out Web-based user forums for discussions about your brand of laptop. Message boards often hold a wealth of firsthand reports.
Once the old drive has been removed from the chassis, you may have to extract it from a caddy or detach a set of mounting rails from its sides. If so, attach the rails or caddy to the new drive right away to keep the screws and washers from getting lost. If a connector is attached to the old drive’s signal pins, remove it and snap it onto the new drive. If you feel resistance, do not force it; you may have it upside down. Damaging the signal pins may render the drive useless.
Step 5: Install your new drive
Next, install the drive in the laptop in the reverse of the manner that the old drive was removed. If it’s a slide-in drive on a caddy, it should slide smoothly into the drive slot and produce a faint click when the connectors engage. If the drive sits flush into a panel on the bottom of the laptop, you may have to insert one edge first (usually the edge with the interface connector) to produce a snug fit. Again, if you feel resistance, or if the drive doesn’t fit properly, take it out and try again. Never force it (or any component) into place. Look for obstructions, and make sure the caddy or rails are installed correctly and that all retaining screws are tight and flush. Once the drive is installed, secure it with any screws you removed earlier and slide the locking mechanism (if any) into the locked position.
Step 6: Configure your new drive
When you power up the notebook, the system BIOS should automatically recognize the new drive. If you created a bootable backup disc or a complete image disc, place it in the optical drive and follow the application’s instructions for restoring your data. You may have to update a driver or two, but you should otherwise be ready to go. If you are performing a clean Windows installation, use the original OS disc and have your CD key code handy. Follow the formatting and partitioning instructions, and load the operating system. Once the OS installation is complete, you can begin installing your applications and any necessary drivers. Then copy over any data you’ve stored on external drives or discs—and enjoy your companion’s new storage horizons right away.
Hard Drive Removal Tips and Tricks
Most hard drives are mounted on rails or metal frames with screws, rubber grommets, or other shock-reducing technology. You’ll need to reuse these rails or frames when mounting your new drive, so take care not to lose them during the swap. Usually, the screws from the old drive will fit the new one, but different hard drive vendors may use screws with a different thread pitch. Your replacement drive will have shipped with its own screws; if these aren’t long enough or are unsuitable for some other reason, you may need to visit your local computer store.
On older ATA hard drives, an adapter may cover the connection pins. You must remove this adapter for reuse with the new drive, but perform the operation cautiously; if you don’t grab the adapter in the middle and pull it straight back, you may bend the connector pins. When this happens, you can try to force them back into position, but straightening them isn’t easy, and they sometimes break off entirely.
If you can’t get a firm enough grip to pull the adapter off, try to pry it up gently with your tools?but do so in tiny increments, first on one side and then the other, alternating until the adapter falls off.
Side-mounted hard drives:
The easiest hard drives to replace are those in laptops that use side-mounted, removable drive caddies or trays. Usually, a latch or screw holds the drive in place, and typically that fastener is accessible from the bottom of the laptop. Undo the latch, or remove the screw or screws; slide out the tray; and replace the drive.
Under an access panel:
Many laptop designers situate their hard drives under a removable panel located on the bottom of the machine. Remove the panel; detach any retaining clips, screws, or frames; and slide the drive out. Usually, you’ll have to pull backward to free the drive from its connector, and then lift the drive up and out.
Under the keyboard or motherboard:
On laptops where the hard drive is located in one of these places, your job is a lot tougher. Carefully store the removed parts in a logical, organized manner, however, and you’ll find the task time-consuming but not impossible.
Though the particulars vary, the dis assembly procedure should go something like this:
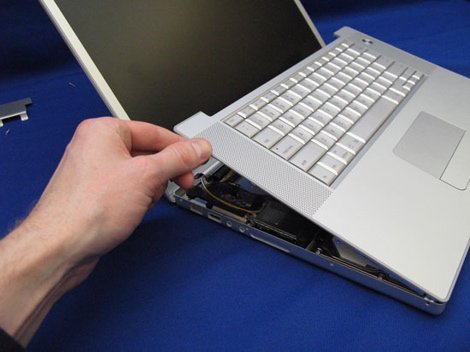
Flip the laptop over and remove the screws that hold the keyboard deck in place. Remove the keyboard deck. This may require sliding a spudger along the seam between the lower portion of the case and keyboard deck to release snaps that may be holding the two together. Some modern units are sealed, so don’t assume that there’s an easy way in. If you discover that your laptop vendor used hot glue to hold things together, you might want to farm out the chore?it’s easy to mess things up with heat.
Remove the keyboard and other components that hide the hard drive or prevent you from dislodging the motherboard. This step may involve taking out screws; peeling back tape; detaching components such as modems and Wi-Fi modules; and detaching clamped ribbon cables, regular cables, or antennas with pressure-fit connectors. You may also have to remove metal RF shields. Be gentle and reread the section on hazards, above.
If the hard drive is situated under the motherboard, you can probably remove the latter after taking out a few more screws. However, the ports integrated onto the motherboard protrude out the case, so you may have to jockey the motherboard as you pull it out. Again, be alert for hidden cables.
Stop the dis assembly process as soon as you have access to the hard drive. I’ve seen drives that were taped in place, screwed down, or held in position by fancy hardware. I’ve also encountered drives that lay loose after I removed a shield or panel. None of these various circumstances pose a special challenge; but carefully observe what’s there, and above all don’t force things.
Once you’ve successfully removed your old hard drive, simply reverse the procedure to insert the new drive and reassemble the laptop. Enjoy your rehabilitated laptop!
Let me know how it goes and if you liked the article or not. If in case you face any problem doing it give a comment and I will get back to you as soon as I can. Do not forget to subscribe my free newsletters for more mind boggling tricks and steps. Cheers!
Here are some of our other articles you might like:

I am a 33-year-old gentleman from a lower-middle-class family hailing from a small village Narasinghpur in Cuttack, Odisha, INDIA. I have a post-graduate degree in M.Tech from BITS Pilani. I started blogging back in June 2014. You can check out my journey and all that I have learnt all these years on my website.


Nice description ! I think I will try this out on my old laptop and let you know. 🙂
Thanks Ben for replying, Let me know once you try if it works out fine or you have any issues. I will be glad to help! If I can.